Showing posts with label food. Show all posts

Sunday, October 24, 2010

Cooking Adventures: Katsu

So I haven’t made any katsu in a while, but I have some old pictures that I can still use to illustrate this. I had made some pork katsu at that point, but you can use chicken, fish – anything you want! You can serve it on rice and you’ll have katsu-don. I've had it with a side of peas or spinach – unconventional, perhaps, but it works! I’ll just be discussing the katsu itself in this post.

The basic method of making katsu is not particularly complicated, and it’s actually very similar to making croquettes. First, you’ll want to take your meat and pound it out until it’s pretty flat. I’m sure there are fancy tools out there, but I just put my pork in a ziploc bag and pounded it out by hand. I find it easier to cook if it’s flattened out.


This is where you’ll see the resemblance to croquettes. Have some flour and panko (or bread crumbs) ready, then beat an egg or two (egg whites by themselves are what you would usually use, but honestly, using a whole egg works just fine). First, cover the meat in flour, then dip it into the egg, and then finally place the whole thing into a plate of panko.


Turn it over a couple of times and sprinkle panko on it until it’s completely covered. Now it’s time to fry this thing!


Put some oil in a pan and start heating it up. I’d probably keep it at about medium when you’re actually frying the katsu. Be sure to have an apron and maybe some long sleeves during this process – little specks of oil tend to jump out, so be careful. I’ve always had tiny burns that sting a little, but otherwise have had very little trouble with this process. Put the meat in and let it fry.


I’m not sure of the amount of time you’re supposed to keep it on one side before flipping it over. Generally, I use my chopsticks to lift it up and check. Don’t worry too much about flipping too early, you can always flip it back over. As you can see, I hadn’t fried it enough the first time around, but it’s nothing to worry about.


 Keep flipping back and forth until both sides become a nice golden-brown. You can cut it to make sure it’s cooked all the way through, but that’s what’s nice about making sure the meat isn’t too thick – as soon as the panko is golden-brown, the meat will be cooked enough.


And there you have it! Serve it with some katsu sauce and any sides that you like. I’ve never made my own katsu sauce, but you can usually find it at regular grocery stores. I’m sure you could always use ketchup or something, if you prefer…

I love katsu, and it’s definitely a nice treat to make for yourself every so often. Enjoy!

Thursday, July 8, 2010

Cooking Adventures: Okonomiyaki

So I tried out a fairly flexible recipe – and I say flexible, because I didn’t have half of the ingredients and it still came out edible. I looove okonomiyaki and just had to try it out! This isn’t the most flavorful rendition in the world, but I still enjoyed it, and it was incredibly easy to make. Okonomiyaki is generally pretty forgiving. Here’s the recipe I originally referred to, although like I said, I didn’t have a ton of the ingredients and improvised most of it.

If you don’t know what okonomiyaki is, it’s pretty difficult to explain, but hopefully this post will give you a better idea. It’s kind of like a pancake, kind of like a pizza, kind of like an omelette… but not. I’ve seen a ton of different variations, and you can do almost anything you want with it, but this is what I did the first time I made okonomiyaki.


First cut up the veggies. One of the most basic components of all okonomiyaki (as far as I know) is cabbage. Shred it up into tiny pieces, along with any other vegetables you like – in this case, I added some carrot in there. Altogether, I had just under a cup of cabbage and a single carrot.


Next, make the batter. It’s basically just flour, water, and egg. To make a small okonomiyaki I just put in a single egg, along with about 20 grams of flour and 2 tablespoons of water. I’m used to putting milk in any type of batter, but that’s not the case here. Have your veggies at the ready and…


Mix it all together! This is where I really felt the difference of the lack of milk – the whole thing felt so dry! But this is fine, and it should be pretty chunky; you won’t want it to drip all over the place when you go to cook it. I just used a fork to mix it all up, but if you have a spatula, it’ll come in handy in a second…


Now to cook this up! But a tad of oil in your pan, just so that the batter doesn’t stick, and dump your mixture onto the pan. Use a spatula to get it all out of the bowl and make the pancake as even as possible. Now we need to steam it.


Look at how unprepared I was! I didn't have a cover for the pan I was using, so I just used a different one that was for a much bigger pan. Just goes to show how much time I put into preparing for this... and how easy it is to pull off. Just improvise with what you have in the kitchen. :P


Let the batter sit for a while and cook. Use a spatula to lift the edge every once in a while and see if it's solid yet. Once the bottom is solid enough that it won't fall apart, go ahead and flip it over with your spatula. Use a knife, fork, another spatula, or something to help you turn it over if you need to.


Let it cook for a while longer on the other side. Don't press down on it or anything, though, since you want it to stay pretty airy and fluffy inside. The edges on mine were totally uneven, and didn't cook as well as the rest of it. This wasn't really a problem in the end for me, but if anyone has any tips on cooking okonomiyaki better please let me know! ^^ The recipe I followed said to only flip it over once, but I think that might have mostly been due to the other ingredients making the process more complicated, and I actually just kept flipping it over until it looked a little more golden and solid.


While still in the pan, I put on the sauce. I didn't have any okonomiyaki sauce, nor the proper ingredients to make one, but that didn't end up being a problem. Apparently it tastes just fine with soy sauce, but I actually put katsu sauce on it and thought it tasted great. I also ripped up some nori (seaweed) into little pieces and put some on there too. I tasted it with and without the nori and liked it both ways - I ended up just covering it in nori completely. If anything, it makes it look a little more interesting. 


Here's the final product! A very simple, rough version of okonomiyaki. Now, I don't think my version really makes this dish justice - if you ever have the opportunity to have some authentic okonomiyaki, I strongly urge you to try it. But if you just want to try something different, tasty, and easy to make with ingredients you already have lying around, then keep this recipe in mind!


Monday, May 3, 2010

Cooking Adventures: Croquettes (Korokke)

Croquettes are a pretty big part of my culture (as I mention in my post about Belgian foods), and it’s also one of my favorite foods ever. I loooove the way they’re made in Belgium (I always need to have fondue parmesan every time I go), but I also love the way they taste in Japan. The Japanese word for it is “korokke,” and although it’s considered a “cheaper” food there and might generally not be as refined as it is in Belgian restaurants, I love all kinds of croquettes. While I’d seen my mother make them before, I’d never made them myself, so I was a little worried about the process.

I just made these with plain potatoes in them, as that might very well be my favorite kind of croquette. The first step to making these is to make good mashed potatoes. I just peeled some potatoes, started heating them up for a bit in water so that they become just soft enough to cut them into chunks, then I boiled them in salted water (I forgot to salt them at first, and added the salt halfway through and it was still okay, but you can always add a bit of extra salt after boiling them if you need to). A good way to check if they’re soft enough is to poke it with a chopstick – if it goes through, it’s ready to go. Drain it, and start mashing~

I wish I had a potato masher, that would have made things a lot easier, but I got through it just fine with a fork. Normally, if I were making simple mashed potatoes, I would have added milk, but for croquettes, make sure to not put in any milk! Add some butter, and maybe an egg yolk if you like (make sure to save the egg white for later if you do this!) Season it to your liking with black pepper and nutmeg. Make sure the potatoes are tasty on their own accord before moving on to shaping the croquettes. If you have time, it’s nice to be able to chill the potatoes in the refrigerator for a couple of hours so that they’re easier to handle.

Now to set up the assembly line!~


As you can see, I got out some bowls and a plate with different things inside. The first big bowl has the mashed potatoes, the second one has some all-purpose flour, the next one a beaten egg (or just beaten egg whites if you decided to put the yolk into the potatoes), and then the last one has panko (or you can just use bread crumbs).


Make small patties out of the potatoes (I actually made little balls, but you can make any size or shape you want, really); then roll them in the flower, dip them in egg, and cover them in panko before setting them aside. I discovered, due to how messy your hands get, that it’s easier to roll all of your patties in the flour first and leave them there until you’re ready for the next step. Then you can dunk them into the egg one by one and put them in the panko. I would suggest not trying to roll them around after they’re wet from the egg, as it’s harder to keep the patties together. Just let the croquettes sit in the plate and gradually cover them with the panko and reinforce the shape of the patties.

By the way, at this point, if you want to make croquettes in bulk and save some for later, you can freeze them in this state. I haven't tried this myself, but I'm pretty sure you can just deep fry the frozen patties later without any problems.

Anyway, you’ll end up with this! Ready to fry~


The next part was the part I worried about. If you have a deep fryer, then you can simply use that (when I go back to my parent’s house, that’s what I would use). If you don’t, though, you can try making your own home-made deep fryer like I did. I used a very tiny pot and filled it a couple of inches up with oil. I heated up the oil to high, but had to turn down the heat down to medium afterwards – so if you want to just put it to medium from the start, it may take a little longer, but it might be easier to start with. You can put a piece of panko or a drop of water in the oil, and if it fizzles, it’s probably hot enough and you’re ready to start frying.


Due to my tiny pot, I put the croquettes in individually. You might not have to do this, but it was easier for me. Careful not to splash hot oil onto yourself – try using chopsticks to gently lower them into the oil. When I put my first one in, it got really dark, really fast...


The panko ended up slightly burnt – although otherwise it tasted fine – but after that was I turned the heat down a bit, to just above medium or so, and cooked them for longer. I was still surprised by how quickly these cooked! If you freeze them beforehand, I'm sure they'll take longer to cook, but in general just cook them until they're golden brown. Play around with the heat to figure out what works best for you – but be careful, hot oil can definitely be dangerous!


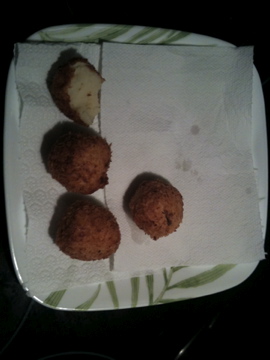
Put the croquettes on some paper towels, dab the oil off and let them cool for a little bit. You should be able to break them open with chopsticks without too much trouble, but I usually use silverware to eat them.
They'll be pretty crunchy on the outside, but not tough, and nice and soft and fluffy on the inside.


And there you have it, a super tasty side dish! I had my croquettes with a piece of salmon and hollandaise sauce (which I'll go over in a different post).


Soooo good! Hope you guys enjoy! ^o^

Saturday, March 13, 2010

Cooking Adventures: Tamagoyaki

I looove trying out various kinds of foods from all over the world, but I'm not very good at cooking (more like, not very experienced? ^^;). I have trouble finding the time and willpower to cook, but I really do enjoy it! I thought I might as well try out a new section of my blog where I have cooking adventures! Hope you enjoy!

As I just started my spring break from school, I have some extra time and resources at home to try out various recipes. Today I tried something simple - Tamagoyaki. By the way, I referred to this recipe from JustHungry.com :) So for this entry, I won't go into the recipe itself, so please go check out that awesome website! But here's my attempt at it~

Mixing all the ingredients is easy enough. This was my first time mixing things like mirin, soy sauce, and sugar into egg but it tastes soo good that way~


I kept almost forgetting to oil the pan before each layer of egg, so don't forget to if you try this yourself! Pour in the mixture, wait until it's a little cooked...


...then the rolling starts! For next time, I took note of the fact that I needed a different pan. Originally, I had just planned to use a spatula the first time making this instead of attempting to cook it with chopsticks. However, the pan I used was pretty small, and the rim was fairly high, so I had trouble picking up the edge of the layer with a spatula, or even a fork. So I was sort of forced into using chopsticks for the most part, which thankfully ended up okay.


Making sure the egg got underneath the roll was a little bit of a challenge as well. Also, in retrospect I realize that I actually let the egg cook a little too long, I think. I didn't want it to end up runny inside, but in the end the layers didn't stick to each other very well.


Another reason I need to use a different pan - it made my tamagoyaki such a weird shape! Like... triangular... which I don't think would have happened if I'd used a flatter pan. Of course, this was more or less taken care of by the next step (hey, for all I know it's supposed to be triangular...?).


Roll it up! Actually, this was a little harder than I anticipated, oddly enough - I had to unroll it and reposition it a couple of times to make it nice and tight. Let it cool for a bit...


はい、召し上がり〜〜


You can see the gaps where the egg didn't stick too well, but it still tasted just fine! おいしかったよ!

This is such a great, simple recipe! It looks and tastes so good and is perfect for bentos! I was satisfied with my attempt and will definitely be making this again. ^^

Sunday, January 17, 2010

Japanese Food Log Summer 2009

So I decided to make another food post, this time from my trip to Japan! Here’s some of what I ate and my thoughts on them…

Soba
These are buckwheat noodles, usually served cold, and it typically comes with a special sauce. It’s a very typical meal; I had it a couple of times in Japan and occasionally make it myself at home. It’s not my favorite food in the world, but I do enjoy it.

Curry rice
Very simple, very common – curry! The basic component of this, of course, is the rice and curry sauce, and there will oftentimes be certain meats or vegetables mixed in the sauce. Again, this is a meal I had a few times while in Japan, but you can easily find it here too. There are so many different kinds of curry, and I really enjoy Japanese curry.

Udon
More noodles, and these are usually served in a hot broth. Udon noodles are usually fairly thick and slippery, and I’ve seen a wide variety of vegetables and meats in the broth. I’ve even had udon served cold, which wasn’t my favorite way of eating it but was still very good.

Korokke
I. Love. Korokke. Maybe because it sort of goes back to my own roots – the original dish is a French dish, “croquettes,” which I mention in my Belgian food post. Like croquettes, a filling is enclosed in a crunchy fried batter. I’ve only had one kind while I was in Japan, so I’m not sure if there are other kinds of it, but the one I ate had a potato puree inside it and was so simple, cheap, and delicious.

Gyudon
There are many kinds of “donburi” foods, which is basically some kind of meat, fish, or vegetable served over rice. Gyudon in particular contains beef – the one I ate had thin strips of beef and onions over rice. It was sooo cheap and surprisingly filling, and while I wouldn’t have it everyday, for something so quick and easy I really liked it.

Bento
I know this is such a super vague term, as bentos can have anything in them, but I honestly don’t know/remember what was in it. “Bento” simply means “lunch box,” and they’re very commonly sold in Japan (in convenient stores and whatnot), but what I remember about this one was the charm of the situation. We were in Osaka, wondering where we could get something cheap to eat, and happened to run into this woman who was setting up a tiny stand of bentos in the street. We each got one for only a couple hundred yen, and simply stuffed with a bunch of different yummy components. We actually ended up seeing many more of these small stands; I wish they existed here~!

Okonomiyaki
I’ve heard this dish referred to as the Japanese version of a pancake, pizza, omelet… It’s really hard to describe okonomiyaki if you’ve never heard of it, but it was one of my favorite foods over there. Although the batter and toppings vary a lot depending on where you go, from my experience it’s usually eggs, cabbage, and some kind of meat or vegetable or something mixed to form a batter, and then cooked similarly to a pancake. There are a couple of different sauces you can pour over it. It’s very different from what most non-Japanese people are used to, so if you’ve never had it before, try it out!

Tuesday, January 12, 2010

Belgian Food Log Summer 2009

I thought people might be interested in what kind of foods people eat in Belgium, so when I went most recently I made a little log of what I ate everyday for anyone who’s curious. Mind you, I only wrote down the more substantial dishes – in the evenings and several times at lunchtime too we would have sandwiches or leftovers and the like. If anyone wants to know any details on these foods, feel free to ask!

Boudin blanc

A sort of “white” sausage that was served with French fries and applesauce. Made by my grandmother~

Chipolatas
Long, thin sausages that taste a little more like what I might find in America, that was served with carrots and mashed potatoes. Also made by my grandmother.

Steak béarnaise
A steak with a sort of buttery sauce, served with a salad and French fries. I ate this at a higher-class restaurant, but even at cheaper places steaks tend to be amaaazing.

Mousse au chocolat
Chocolate mousses are usually fairly light and there are so many different chocolate flavors out there, but because it’s Belgian chocolate, it’s almost automatically great. The time I had mine at a restaurant there were small bits of chocolate mixed in with a light whipped cream on top~

Gauffres de Brussels
Um, they don’t call them Belgian waffles for nothing. I loooove these things! There are the more pedestrian, but still delicious kind you order and walk around with that are usually just coated in sugar, but you can also sit down at a restaurant or café-type place and order a more fancy waffle with fruit and stuff. I usually get one with strawberry and whipped cream. This may really heavy and unhealthy, but really they’re usually a very light dessert and not considered that big of a deal.

Croquettes au fromage (aka fondus au parmesans)
Croquettes come in many different forms, and it’s hard to explain what it is if you don’t know already. There’s always some kind of filling enclosed in a batter and deep fried. It’s sort of grainy and crunchy on the outside, and is usually filled with mashed potatoes (probably my favorite kind <3), shrimp, or in this case melted cheese. I guess these are comparable with those mozzarella stick things… except, in my honest opinion, infinitely better (^^)

Poulet-frittes et compote de pomme

Nothing particularly outlandish, chicken in a complementing brown sauce with French fries. What might be a little different for some was that the other side was applesauce. This is pretty common in Belgium, I eat applesauce with a lot of different things!

Crêpes au champignon crème

If people are familiar with crepes, most are probably imagining the sweet kind, with whipped cream and fruits and whatnot. There are also the salty kind, though, where you can put in meats, vegetables, fish, sauces, etc. The possibilities are endless~ (Seriously, the menu of the crepe restaurant we went to was like a novel…) The one I had was with cream of mushroom.

Spaghettis bolognaise
An extremely common dish, you might have had this before even if you’ve never been to Europe. It’s simply spaghetti noodles with a meat and tomato sauce, and sometimes other vegetables such as carrots, peas, mushrooms, etc.